So, you’re thinking of how to fix a Hyundai Sonata fan belt? You’re on the right page. One common issue that can arise with a Sonata is problems with the fan belt.
The fan belt, also known as the serpentine belt, plays a critical role in your vehicle’s engine cooling system and power distribution. If it starts to squeal or shows signs of wear and tear, it’s time to roll up your sleeves and work on it. So, how do you fix the fan belt?
Quick Tip: To fix a Hyundai Sonata fan belt, start by locating the tensioner pulley. Then use a wrench to relieve the tension. Slip off the old belt, replace it with a new one, and carefully thread it through the pulleys according to the manufacturer’s diagram.
Keep reading to access a detailed step-by-step guide.
How To Diagnose Issues With Your Hyundai Sonata Fan Belt
Here’s how to tell if there’s a problem with your Hyundai Sonata fan belt:
1. Pay Attention to Squealing Noise
If you hear a high-pitched squealing noise coming from your engine, especially when you accelerate or turn on the air conditioning, it’s a strong indicator that your fan belt might be the culprit.
2. Engage in a Visual Inspection
You can also pop the hood and take a look at the belt. Cracks, fraying, or visible damage are signs that your Hyundai Sonata fan belt needs attention.
3. Check the Belt Tension
You can also tell if there’s an issue with your Hyundai Sonata fan belt by checking its tensioner. Gently press down on the belt with your finger. If it feels loose and has more than a half-inch of give, it’s likely time for a replacement.
Tools Needed To Fix Hyundai Sonata Fan Belt
Before you start fixing the belt, make sure you have the following tools and materials in place:
- A New Serpentine Belt: Ensure you have the correct replacement fan belt for your Hyundai Sonata model. Refer to your vehicle’s manual for the specific part number.
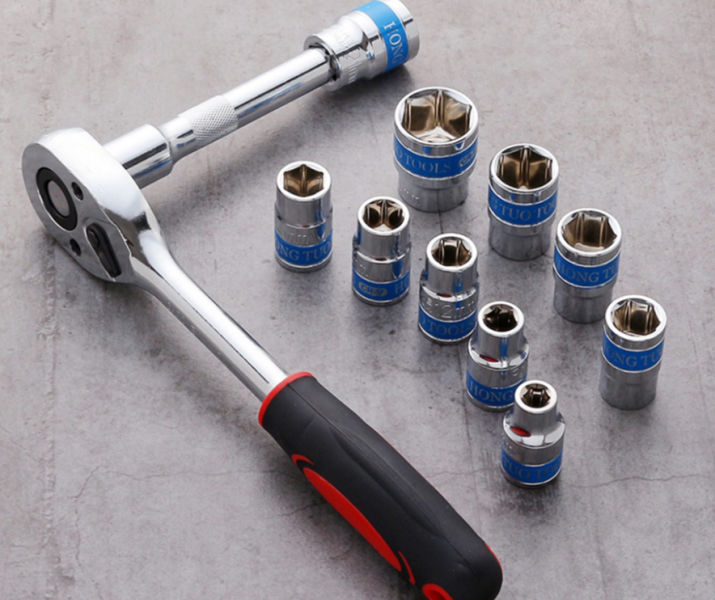
- Socket Wrench Set: You’ll need this for loosening and tightening bolts.
- Pliers: Useful for removing and installing the belt.
- Owner’s Manual: Keep this handy for reference and guidance specific to your Sonata model.
How To Fix Hyundai Sonata Fan Belt [Step-by-Step Guide]
Here’s how to fix your Hyundai Sonata fan belt when the old one becomes faulty:
Step 1: Park the Car on a Flat, Stable Surface
Before you start working on the serpentine belt, ensure you park your vehicle on a flat, stable surface, engage your parking brake, and turn the engine off. A flat surface provides better stability for both you and the vehicle. This stability is crucial when working with tools and trying to access and manipulate engine components.
Also note that turning off the engine ensures that the serpentine belt and other engine components are not in motion while you’re working on them. The fan belt is connected to various engine components, and attempting to replace or adjust it while the engine is running can be extremely dangerous.
That said, you may want to disconnect the battery to avoid any accidental starts.
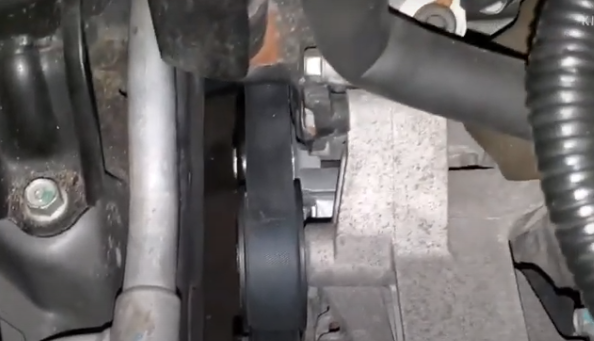
Step 2: Locate the Tensioner
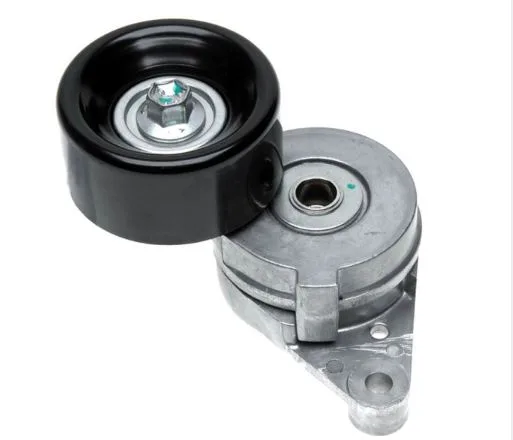
The tensioner is a pulley that keeps the fan belt tight. It ensures that the belt remains securely in place and maintains proper contact with the pulleys of various engine accessories.
You might need to use your owner’s manual to locate it. Once you locate it, you’ll need to release tension on the belt to remove it.
Step 3: Loosen the Tensioner
Again, a tensioner is designed to keep the fan belt tight for efficient power transmission. So, to remove the belt, you have to first loosen the tensioner. Doing this allows you to reduce the tension on the belt, making it much easier to remove or replace the belt without excessive force or the risk of damaging other components.
If you attempt to remove or install a fan belt without loosening the tensioner, you may strain or damage the belt, pulleys, or the tensioner itself. That said, insert the socket wrench into the bolt on the tensioner and turn it counterclockwise to release tension on the belt.
Step 4: Remove the Old Belt
Once you’ve released the tension, you can remove the old belt. Carefully slide the old fan belt out from around the various pulleys. Take note of the belt’s path and how it winds around the pulleys; you’ll need this for installing the new one.
Step 5: Install the New Belt
With the old belt removed, place the new fan belt around the pulleys, following the same path as the old one. Make sure you compare the old belt with the new one to ensure they are the same size and have the same number of grooves. Then, use the tensioner to create enough slack to slip the belt over the last pulley.
Step 6: Tighten the Tensioner
It’s important to tighten the tensioner after fixing a new fan belt. To do this, use the socket wrench to turn the tensioner bolt clockwise, increasing tension on the belt until it feels snug. Be sure it’s properly seated on all the pulleys.
Step 7: Check the Belt
Don’t forget to check the belt to ensure you fit it properly. Give it a gentle push; it should have a bit of give, but not too much. You might want to refer to your owner’s manual for the recommended tension of a fan belt for your Hyundai Sonata model.
Step 8: Test Your Vehicle
After you’re done fixing and checking the fan belt, reconnect the battery if you disconnected it and start your vehicle. Pay attention to any unusual noises and watch the belt’s movement. It should run smoothly without squealing.
Maintenance Tips For Hyundai Sonata Fan Belt
Preventing future fan belt issues is just as important as knowing how to replace one. Here are some maintenance tips to keep your Hyundai Sonata’s fan belt in top shape:
- Periodically check the condition of your fan belt for any signs of wear and tear. Early detection can prevent more significant problems.
- Ensure the belt’s tension is within the manufacturer’s recommended range. Over-tightening can cause damage, while under-tightening can lead to slipping and squealing.
- Keep the area around the belt clean and free from oil or debris that could cause slippage.
- Consult your owner’s manual for the recommended replacement interval for the fan belt. Don’t wait until it fails to replace it.
- If you encounter deep puddles or floodwaters while driving, try to avoid them as they can cause water to splash onto the belt, potentially leading to slipping.
Just in case you’re fond of buying used Hyundai Sonata from abroad, you might want to check out the risks and benefit of buying used cars from America.
Important notes:
- This is a simplified overview, and specific steps might vary depending on your car model.
- Always refer to your owner’s manual for detailed instructions and safety information.
- If you’re unsure about any step or encounter difficulties, consult a qualified mechanic to avoid damaging your car.
|You might also want to check out our guide on how to use an engine oil treatment.
Final Note
Replacing a Hyundai Sonata fan belt, also known as the serpentine belt, can be a complex task if you’re not familiar with car maintenance. It’s crucial to prioritize your safety and consult a qualified mechanic if you’re unsure about any steps involved in the process.
However, if you’re comfortable working on your car and have the necessary tools, you can follow the step-by-step guide outlined here on how to fix Hyundai Sonata fan belt.
Remember, regular maintenance and checks can help you avoid fan belt problems in the first place.